Friday, January 9, 2015

Read XML with Optional Elements

This post I will describe how to parse XML with optional element.

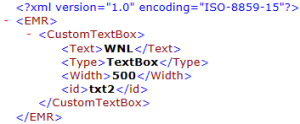
We will use below source xml file which has three customer details, along with awards details, and <CUSTOMERAWARDS> is a optional xml element.

Sample XML file
Sample XML File

We will parse this file using tXMLMap component. so fist of all add tFileInputXML and configure as below.

  • Assign source file path

  • Create single column in schema named as

  • Create CUSTOMERS column with "Document" data type in schema.

  • Put loop Xpath query = "/CUSTOMERS"

  • In Mapping section add XPath Query ="."

  • Select Get Nodes check box.

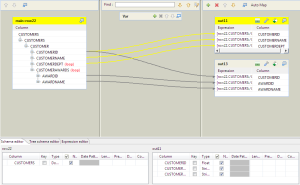
Add tXMLMap component and connect with tFileInputXML component using Main link and create source tree structure as shown in image.
Note: You can create create sub elements manually or  it can be  populated from XSD file or from repository.

Add two Outputs and drag and drop relevant source columns to output (Refer image).


tXMLMap Configuration

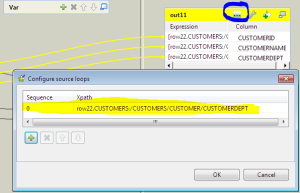
Click on first output`s "set loop function" short menu and add one sequence then select xpath = customerid xpath, see the image for more details.


tXml Map First Output

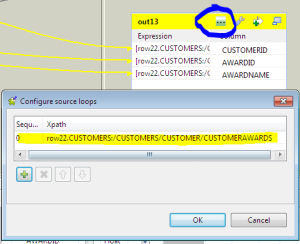
Our first Output is ready now you have to configure second output so follow the steps we did for first output and select xpath= customerawards, see the image for more details.


tXml Map Second Output

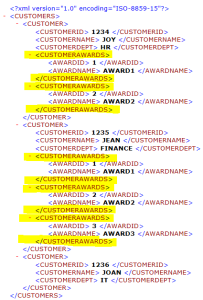
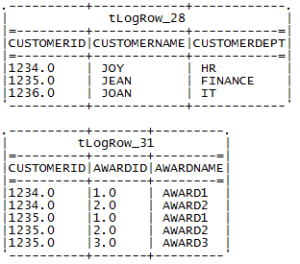
Add tlogrow for each output and then execute the job you will see output like below. If you observe, customer id 1236 it has no awards extracted but customer id 1234 and 1235 awards extracted completely.


OutPut
Out Put

Difference between tMap and tJoin

tMap is frequently used component for joins and lookup purpose, it is also use for verity of operations and transformations, whereas tJoin is used for join and look-ups only.


tMap


tJoin


It accepts more than one input one is main and rests of the lookups.


It accepts only two inputs and only one is main and other one is lookup.


We can create more than one output


It has two default outputs one is "Main" and another one is " Inner join reject"


tMap has "inner join " and " left outer join" joining model


tJoin offer`s only "inner join"


tMap offers three match model


  1. Unique Match
  2. First Match
  3. All Matches


tJoin defaulted with Unique match


tMap allows to store data on file option for lookup data processing


tJoin doesn`t offer this feature


In tMap you can filter data using filter expression


tJoin doesn`t offer this feature


You can write transformation using expression builder at each column level


tJoin doesn`t offer this feature

Split Rows to Columns

This post I will describe you how to split rows into columns, we will use below sample as input records.

Input Rows.

Input Rows
Input Rows

Expected Output.

out put
Out Put

Create a Job and add tFixedFlowInput component and  put above input as "Use inline content" and create schema as shown in image.

Input Schema
Input Schema

Add tPivotToColumnsDelimited  component and connect with tFixedFlowInput component as main connection then configured this component shown in below image.

tPivot component Configuration

Configurations :

Pivot Column ="Type"

Aggregation column="Value"

Aggregation Function ="last"

Group by "ID" and "Name" column.

Rest of the configuration is for output file, where our output will be transferred. to read output file we can use either delimited component but for quick review I`ll use tFileInputFullRow.

Add tFileInputFullRow below the tFixedFlowInput component and connect with "On Sub Job Ok" trigger. and provide previously created file path and rest of the details.

add tLogRow and connect to tFileInputFullRow component and execute the job you will get above out put on console.

Final Job Design.

Job with OutPut
Job with OutPut

This component will create N number of columns based on your input, if you are dealing with fix schema then it will create complexity for further processing.

Thursday, January 1, 2015

Split large XML into multiple XML

In this post, I will describe you how to split large XML into several xml.

Here is our Sample XML file. ( which is not huge but just a sample)

Split Xml Talend

We are expecting three XML files from sample xml hence lets start with metadata creation for this sample file.

Once you created metadata then you can drag and drop schema to job designer. for the scenario we will choose tFileInputXML component.

Now add another component tXMLMap and link tFileInputXML to tAdvancedFileOutputXml then configure tAdvancedFileOutputXml as shown in image.

tAdvanceOutputXMl Mapping

Now we have mapped our source column to output columns, but it will output all the rows in single file, to create a file for each row we have to configured tAdvancedFileOutputXML component using Advance property of component tab. use "Spit output in Several files" option with value as "1". by doing this it will create new file for each row.

tAdvancedOutputXML Setting

After run, this job will create three files on mention path like below.

Output Xml Files

And here is the final output.

Output Xml Files splitxml6 splitxml7

Tuesday, December 23, 2014

Useful Configuration and Log Variables

Talend has various global variables which can be use for logging and configuration propose. I have identified them and listed down below, you can use them as it is in expressions or costume code component.

  • pid

  • rootPid

  • fatherPid

  • clientHost

  • defaultClientHost

  • contextStr

  • startTime

  • isChildJob


These variables name itself suggesting the use of that particular variable.

You can use it like.

context.ProcessID=pid;


Friday, December 19, 2014

Creating XML metadata

This post i will show you how to create XML metadata using Talend and simple use of tFileinputXML component.

List of topics covering in this post.

  1. Simple XMl Parsing using tFileInputXML.

    1. MetatData Creation.

    2. XPATH finding.

Prerequisite

  1. Talend Open Studio

  2. XML File.

Source XML file for demonstration.

<?xml version="1.0"?>
<PurchaseOrder PurchaseOrderNumber="99503" OrderDate="1999-10-20">
<Address Type="Shipping">
<Name>Ellen Adams</Name>
<Street>123 Maple Street</Street>
<City>Mill Valley</City>
<State>CA</State>
<Zip>10999</Zip>
<Country>USA</Country>
</Address>
<Address Type="Billing">
<Name>Tai Yee</Name>
<Street>8 Oak Avenue</Street>
<City>Old Town</City>
<State>PA</State>
<Zip>95819</Zip>
<Country>USA</Country>
</Address>
<DeliveryNotes>Please leave packages in shed by driveway.</DeliveryNotes>
<Items>
<Item PartNumber="872-AA">
<ProductName>Lawnmower</ProductName>
<Quantity>1</Quantity>
<USPrice>148.95</USPrice>
<Comment>Confirm this is electric</Comment>
</Item>
<Item PartNumber="926-AA">
<ProductName>Baby Monitor</ProductName>
<Quantity>2</Quantity>
<USPrice>39.98</USPrice>
<ShipDate>1999-05-21</ShipDate>
</Item>
</Items>
</PurchaseOrder>

Step 1: Create XML Metadata using Talend.

  1.  Go to the Talend repository Metadata node and right click on File XML .
    Create XML Metdata Talend 

  2. Provide valid name for metadata.

  3. In third Step we have to find out which node should be our XPATH LOOP Expression? for that you can find out the leaf node or last node of XML, in above file <Item> is the leaf node, so we will take that one. see the screen for mapping.


XML Metatdata 

  1. Just Drag and drop all required columns from XML to see above

  2. Once column selection completes then Click on preview button to review the extracted result.

  3. If every thing looks fine then proceed with finish button which will take you to the next screen with generated schema, here you can change data type, column name, length if required.

Generated XML Metadata

Now our XML metadata ready to use, then just drag and drop xml schema to job design it will ask two component

  1. tFileinputXML.

  2. tExtractXMLField.

For now we will use tFileinputXML to extract XML data, lets drop that.

Connect tlogRow to tFileinputXML component and execute the job you see the result, if result not displayed then repeat above steps.

This post we have created

  • XML Metadata

  • Simple XML parsing.

  • Simple use of tFileinputXML component.

Monday, August 25, 2014

Set/change Workspace default location

To set this workspace location, edit "config.ini" file in "configuration" folder at root of Talend installation folder.
In this file you can use variable "osgi.instance.area" or "osgi.instance.area.default" to specify your workspace location.
Follow below steps to complete this activity.

Step 1. Go to the Talend Installed directory then configuration folder like C:\Talend\TOS_DI-Win32-........\configuration.


Step 2. Open config.ini file.

Step 3. Write down below code at first line of file.

osgi.instance.area=provide your workspace path.

e.g.

osgi.instance.area=C:/Talend/TOS_DI-Win32...../workspace

Step 4. Save config.ini file keep open.

Step 5. Restart Talend, once you see first window then remove above line of code, save and close the config.ini file.


Contact Us

Name

Email *

Message *